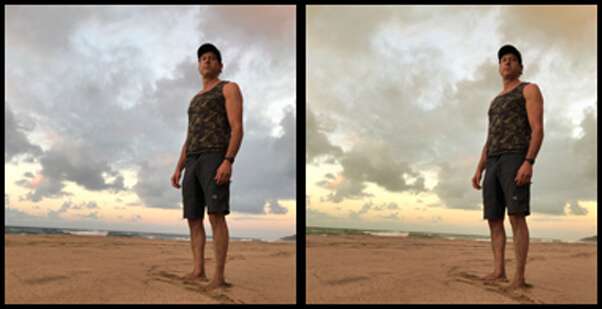
We have always planned to add a wow factor to the outdoor images. Sometimes the pictures clicked us showcase the boring sky images. To make them look mesmerizing and interesting, we can always go ahead with changing the sky in photoshop or replacing it completely. There are always tools available to give your outdoor pictures an edge. The all-new Adobe Photoshop tool in 2022 helps you with proper sky replacement. This sky replacement tool makes photographer pictures look amazing in just a few clicks. You do not have to spend hours color-correcting the image to get the image you like. It is now a simple and enjoyable process.
Why do Photographers Opt to Replace Sky?
Most photographers do a planned outdoor shoot to get fantastic results. They study the natural light and weather, track the sun’s movement, etc. However, the results may vary when they take a photograph. It can come monotonous or like the one they never expected. A frame can come out boring, or it can be too much cloudy. For this, the sky replacement image tool in Adobe Photoshop is helping the photographers. There are some more reasons why photographers opt for the sky replacement:
The unclouded image that leads to boring images
Dull images because of insufficient lighting
The image isn’t spiced up according to the provided requirement
Mundane sky images may also lead to using this tool in Photoshop
The last update of the Adobe Photoshop sky replacement tool came in April 2022 (v23.3), which is used for fine-tuning sky replacement. The user can change the sky’s brightness, temperature, lighting mode, color, etc., by giving the picture an edge. Changing the sky in photoshop can be done with ease, just need some tips.
Let us now see how to change the sky in Photoshop. For this, you will require different sky images you have clicked to give the edge to your photographs.
How to Replace the Sky in Photoshop
Replacing sky in Photoshop in 2022 is not a tedious job anymore. With a few clicks, your images become mesmerizing again. The manual replacement of the sky was quite hectic because first, you need to create the mask of the existing sky, then add a layer, and then create a new sky. It is not easy to get around the tree branches and other existing details. This made way for the introduction of the sky replacement tool for the first time in 2021, and the tool available now is the enhanced version.
Below is the tutorial type to enhance your sky images in the Adobe Photoshop tool. Let’s get started.
Accessing the Sky Replacement
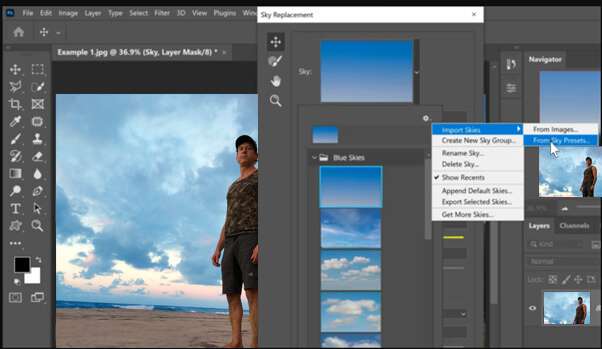
Click on Edit, and then choose Sky Replacement from the option. You can choose any of the skies by clicking on the dropdown menu. Now, click the Setting or Gear button to get more sky options. The web image will get opened where there will be umpteen options. There are even presets present that you can use to replace or change the sky. After downloading the image, click on the dropdown menu in the Sky replacement. Now, click on the Setting button, Import Skies, and click on the From Sky Presets. Select the Sky Preset, and then click on open.
Convert Images into Sky Extension
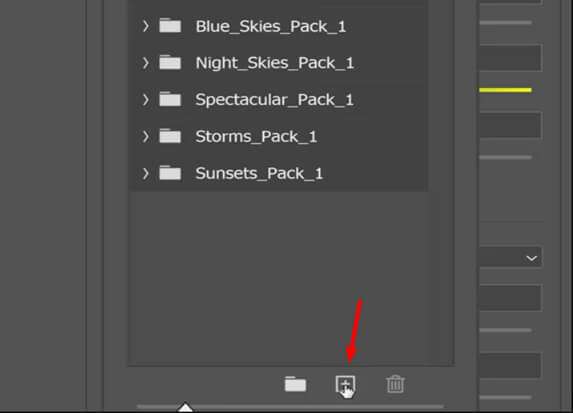
Photographers can use their sky images but must convert them into the Sky extension (. sky). Click the plus button (as shown in the image). Select the image you want to use, and then press Open.
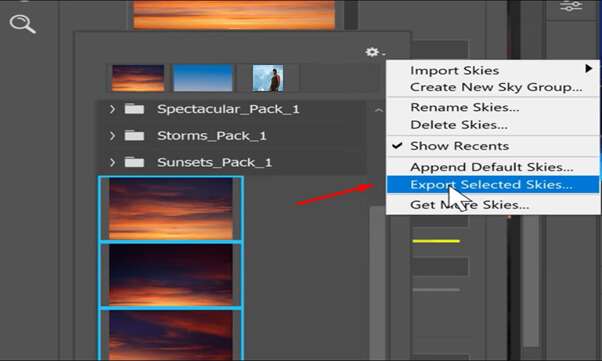
After this step, select all the sky images and click on the Setting icon. Click on Export Select Skies by clicking on the options with a right-click. Now, click on Save.
Click on the Final Sky Image
As you have varied options in Step 2, you can click on any of the sky images you want to use to create an amazing touch. You can play with the provided Settings to make the images look more thoughtful and creative. For example, if the replacement image does not blend well, you need to work with color adjustment or lighting adjustment scales. If you face any problem, you can always try the ‘Shift Edge’ option. It will help merge two images quite beautifully and eventually it helps changing the sky in photoshop.
Mirroring the Sky Replacement
The following are the simple steps to use the sky replacement image tool to get the perfect sky images. However, the only limitation the users may face is that this Adobe Photoshop tool will never recognize the sky reflections.
This Sky replacement tool will do a great job of masking the sky but will ignore the sky’s reflection. For this, the user must flip the images and manually create the reflection using Photoshop.
Here, the users need to unlink the layers created and drag the masking to the new blank layer. You have to flip the sky and the layer mask vertically. After this, reposition the mask and the sky evenly. The sky reflections in your images will be more realistic and eye-catchy if they are compressed slightly and made darker than the original ones.
The photographers have to blend the images by adjusting the lighting manually for changing the sky in photoshop. It will make the reflection look more realistic. You can add a ‘Gaussian blur’ to your sky image to give a realistic effect to your image’s reflection.
Why Choose This Adobe Photoshop 2022 Feature For Sky Replacement?
Most of you must be thinking about why to opt for this sky replacement tool when masking and adding a hue to the images can be done manually. Well, this new tool with the latest 2022 version improves your work. You are good to go in three simple steps and enhance your boring Sky images.
Moreover, you get a collection of sky images that comes in three different categories:
- Spectacular
- Blue Skies
- Sunset
The Blue skies feature is used for the daytime sky, the Spectacular is used for storm clouds, and the Sunset feature is used for night and rainbow skies. You get orange, yellow, red, and pink colored sunset shades. You can download your original sky image from the Sky replacement window and convert it into a Sky extension, and use it. By using Free Sky Presets feature, you can include the northern lights, tornadoes, stars, fireworks, and a milky way in your image. The photographers feel that this image enhancement tool by Adobe Photoshop has given them an edge to control versatile aspects of an image. The adjustment layer and the layer mask blend well.
Quick Tips for Getting the Amazing Sky Images
- Do Editing First: Before using the replacing sky in Photoshop tool, you must do the required editing in your original picture. The Sky replacement tool will modify the required elements of your original clicked image. The final result will make your photograph look stunning.
- Carry Out the Edge Enhancement: The new 2022 edge enhancement feature in the new Sky replacement tool. The new feature will develop the contrast between the foreground and the background to preserve the thin line objects. For improved quality, a new layer group is also introduced in the layer stack of the Sky replacement. It controls the lighting adjustments and is applied to the object edges to make it look smooth.
- Personalize Your Sky Images: Sky layer mask from the Sky Replacement Group will help to cover the background so that it does not bleed over your original image. Use the brush tool to add or remove the additional sky formed. You can use the Move Tool in the Sky Replacement window to control the sky’s position. The tailoring of the sky replacement feature will help with realignment.
- Do Harmonize the New Sky with the Original Image: You can always harmonize the new sky with your original image by perfectly blending the color. The Sky replacement tool does the harmonization correctly and automatically. The further look of your Sky images can be adjusted with the Foreground adjustments. This tool provides multiple features like screen lighting, multiplying of darkness, color adjustment, etc., to get the desired sky image.
Set the Mood of Your Audience Right with the Sky Replacement Tool!
This tutorial changing the sky in Photoshop has a quick glimpse and detailed steps on setting the perfect mood for your images with a great sky. This electrifying tutorial helps photographers replace Adobe Photoshop’s skies with something good. It masks the original sky image with great blending and lighting options.
It will help your sky to look naturally enchanting and provide an edge to your photographs. There are some round trips included to change the sky with the background replacement tool. The best thing about this Sky replacement tool is that you can change or replace the sky in three easy steps. Moreover, you can always use the provided tool in Adobe Photoshop to make the temperature look cooler or warmer. This tool will give supreme perfection to your skies picture, and you can make them social media-worthy.
You can get top-notch image editing and sky replacement services from Clipping Path Arts. Our experts add a professional touch to every picture by using advanced technology and tools. Request a quote or a free trial from us!